Iwaki pump bearing

schwaggs

Well-Known Member
Supporting
Messages
1,545
Reaction score
135
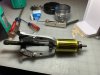
Anyone replace the bearings in an Iwaki pump? I couldn't find much about it other than a post saying someone did it.

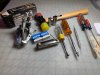
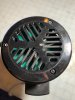
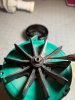
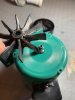
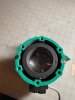
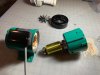
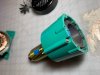
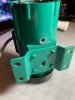
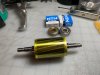
I have a Iwaki 40RLXT that after cleaning, makes whirring noise. I took it apart and sure enough, one of the bearings feels gritty. I tried lubricating it and that helped but it is clearly on the way out. Thankfully, there is a number stamped on the bearing NTD 6200Z which it commonly available online. I ordered a couple and will try replacing them next week when the bearings arrive. I'll be sure to post some pictures for the next person!

I've used Iwaki pumps since the 90s and this is the first one that developed a bearing problem. Some of my pumps were in service for 8 years before being sold for some others. Ironically, this is one of the new pumps I bought 3 years ago or so.
 
Parts arrived today and I swapped out the bearings. Overall, a fairly easy project for someone handy with a few basic tools.

5/16" (probably 8mm) nut driver (to remove the pump head)
Phillips screwdriver (to remove the fan cover and separate the motor body)
2mm allen wrench (to remove the magnet)
Very small gear puller (the one pictured was too big)
A couple deep sockets (to tap the bearings back in place)
Hammer (to tap bearings back in place)
Small pick or screwdriver (to remove the fan retainer clip)
Various size screwdrivers to begin prying the bearings off
 

Attachments

  • image14.jpeg
    image14.jpeg
    105.7 KB · Views: 2
Start by removing the pump head - same procedure you have no doubt done many times to clean the pump.
Place the motor body on your work bench and remove the 3 phillips head screws to remove the fan cover.
 

Attachments

  • image3.jpeg
    image3.jpeg
    58.8 KB · Views: 2
Carefully remove the fan blade retaining clip. Do not pry too hard and break it as you need it to reinstall the fan blade later.
Take this opportunity to clean the blade, cover and body.
 

Attachments

  • image4.jpeg
    image4.jpeg
    60.6 KB · Views: 2
  • image5.jpeg
    image5.jpeg
    53.6 KB · Views: 2
  • image6.jpeg
    image6.jpeg
    51.2 KB · Views: 2
Flip the motor body over and remove the 2 phillips head screws on either side of the motor body. These hold the 2 halves of the motor body together.
 

Attachments

  • image2.jpeg
    image2.jpeg
    41.6 KB · Views: 2
Separate the 2 halves of the motor housing. You may need to gently tap on the housing to get them to separate.
 

Attachments

  • image7.jpeg
    image7.jpeg
    78.3 KB · Views: 2
Place a piece of tape on the magnet and armature so you can re-assemble them in the same orentation. This should help keep the spinning assembly balanced.
 

Attachments

  • image8.jpeg
    image8.jpeg
    66.2 KB · Views: 2
Remove the plastic cap that was at the bottom of the housing. Rotate the magnet until you see an allen screw. Using a 2mm allen wrench, remove the set screw. Separate the magnet assembly from the armature. You may need to twist and pull to get the magnet off.
 

Attachments

  • image1.jpeg
    image1.jpeg
    49.3 KB · Views: 2
  • image9.jpeg
    image9.jpeg
    66.6 KB · Views: 2
Carefully pry the bearings off using screw drivers. Work your way around the bearing, gently prying until you make enough room to use the gear puller. Once you can install the gear puller, the bearing comes off easily.
 

Attachments

  • image10.jpeg
    image10.jpeg
    82.3 KB · Views: 3
  • image12.jpeg
    image12.jpeg
    87.3 KB · Views: 3
Install the new bearings using deep sockets that just fit over the motor shaft and put pressure on the inner race of the bearing. It doesn't take much to tap the bearing to the bottom of the motor seat. Using the socket allows you to put even pressure on the race.
 

Attachments

  • image13.jpeg
    image13.jpeg
    110.8 KB · Views: 3
Install the armature and bearing into the outer motor housing. Make sure the bearing is fully seated in the outer housing. Reinstall the magnet assembly making sure the pieces of tape are lined up and the end of the motor shaft is flush inside the bottom of the magnet assembly. If it is not flush, you may not have the proper clearance between the magnet and motor housing.
 
Remove the tape. Reassemble in reverse of the disassembly.

This Iwaki 40RLXT is perfectly quiet now! The airflow from the fan is the loudest part and you can't hear that over the water in the overflows.

The bearings are the ONLY wear item on these motors. Zero brushes or anything like that. Replacing the bearings and keeping the fan and pump body clean should allow an Iwaki pump to last forever.
 
Last edited:
No problem!

Forgot to add that I'm happy to help anyone in the Atlanta area replace these bearings.
 
Back
Top