Equipment cabinet

Cook

President
Staff member
Supporting
Messages
1,215
Reaction score
1,397
Location
Roswell
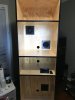
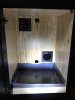
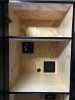
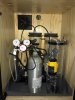
Being out of the country for two weeks reinforced the need for some reliable automation for my tanks. I came home last week to some unhappy and pale SPS. All the equipment I have collected can't live on the floor, so after looking for a cabinet I could make fit in the space I had available, I decided to build my own. The cabinet itself will be 75" tall 18" deep, and 22" wide to fit beside the Red Sea 170 or any other tank I move to in the future.

IMG_6958.JPG
 
I'm a graphics guy, so Illustrator is my program of choice. Here is a pic of what I am going for.

22%22 mockup.jpg
 
I'm trying a few techniques that are new to me. Pocket screws for the shelves and I want the outside of the cabinet to be black, so I am going with dye instead of stain before I coat with polyurethane. The last time I tried a black stain I got brown. I got the cabinet frame together yesterday, this is 3/4" cabinet grade pine from Home Depot.

IMG_6967.JPG
 
I completed the shelving. I moved the shelf spacing around a little to keep the controllers higher up. The rain has been slowing me down. I am working on the doors which are shaker style frames with an insert. I have the door frames completed, but my 1/4" plywood inserts have warped with all the humidity. I am working to flatten them out. I am trying to get the doors together today so that I can dye the outside and coat the cabinet with polyurethane tomorrow.
IMG_6973.JPG
 
In case anyone wanted to know how I did the doors. I cut channels in the 1"x3"s with my router table to contain the plywood and used wood glue and pocket hole screws to assemble. I tried the black dye on some test pieces today, but it isn't absorbing evenly. I am testing a pre stain conditioner which I will follow up with dye and stain to see which one works.
IMG_6987.JPG
 
Thanks for all the comments. Here is my color test. Pre-conditioner plus a coat of dye plus 1 coat of stain looks the best to me as it is more even in appearance. Hard to capture in a photo. stain_test.jpg
 
Satin clear coat?
Yes, it will be. Trying to get the staining done tonight and tomorrow morning before the rain comes back in. Hopefully clear satin polyurethane this weekend using water base version to avoid the fumes.
 
Yes, it will be. Trying to get the staining done tonight and tomorrow morning before the rain comes back in. Hopefully clear satin polyurethane this weekend using water base version to avoid the fumes.
That black will look great!
 
Things really slowed down for me when I went back to work, however, I was able to get to the point of a whole assembled cabinet yesterday. I went with some 120mm fans for air flow in the controller and equipment areas. I added the shower pan liner in case of leaks. The GHL mini will be getting a leak detector accessory sometime this year. Now all I need is a 260 gallon upgrade. ;) I'll be working on the controller section next.IMG_7055.JPG
 

Attachments

  • IMG_7049.JPG
    IMG_7049.JPG
    414.5 KB · Views: 41
  • IMG_7050.JPG
    IMG_7050.JPG
    382 KB · Views: 44
  • IMG_7051.JPG
    IMG_7051.JPG
    381.9 KB · Views: 48
  • IMG_7053.JPG
    IMG_7053.JPG
    480.3 KB · Views: 49
Back
Top