Two Red Sea tanks

joseayes

Well-Known Member
Market
Messages
1,250
Reaction score
365
Location
Lawrenceville
Got the feeling to start up again after numerous things going on in life.
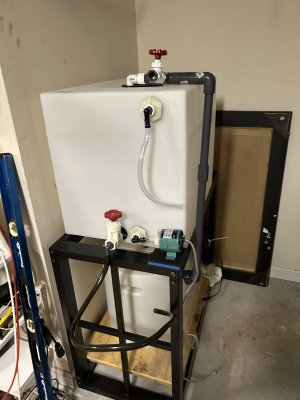
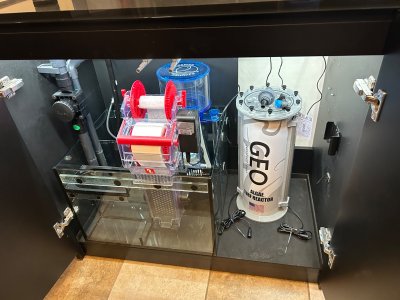
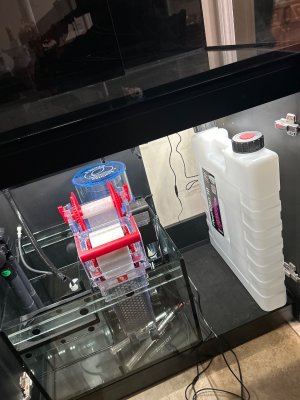
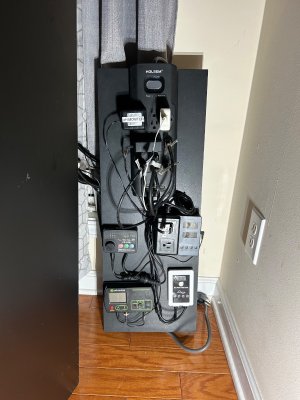
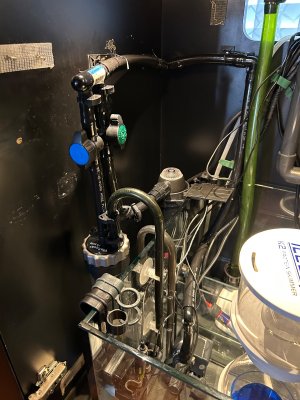
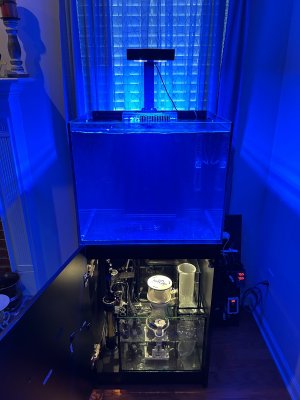
Almost finished the RODI reservoir and SW mixing station, though I could get you guys and gals opinions and critique, I might be missing something and I don’t even know what it could be.
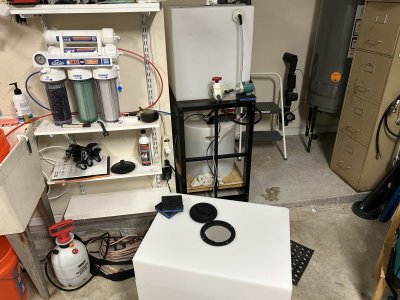
This mixing station consists of a 150gpd RODI, two membranes and I’ve got a booster pump as an add on. Will get the RODI flod guardian later.
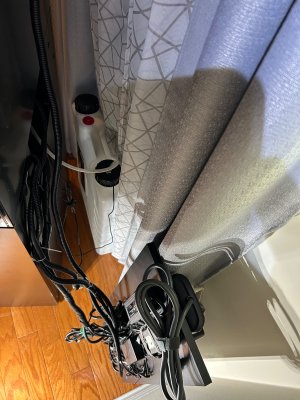
Bottom tank would be fresh water to replenish reservoir and it will be pumped up with a Sicce pump, union PVC to remove tank for cleaning.
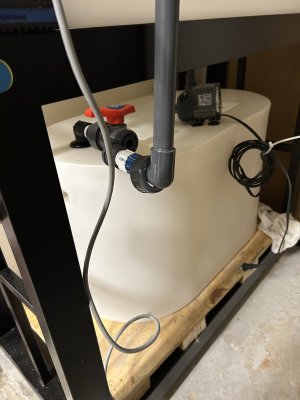
Top tank would be for mixing, receiving fresh water from a bulkhead on top to try avoiding water backup flow. Added a valve on top because it was just there and I probably hookup for extra water in a separate container, might need to ad another valve to shutoff mixing tank 1.
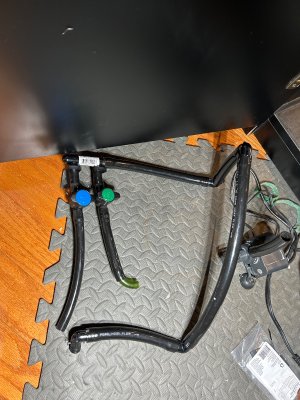
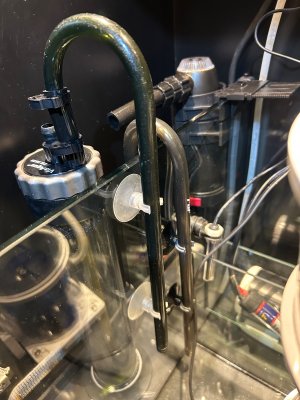
Front of mixing tank with valve to deliver mix ready water and pump for mixing on front too, though I could use the clear hose for checking also on level, even though the tank has a printed in level of gallons on opposite side.
Not sure what else I could be missing.
 
Can I ask what this cost you to do? Ballpark?

Why add the flood guardian later?

Probably overkill for me, at least at the moment, but good to have an idea what these things cost for future plans. For the time being, I'm probably doing ATO in a 5-gallon bucket... I haven't decided where/how I'm mixing water, and how much. I know I want to do more than 5 gallons at a time, but 🤔
 
I’d say that in numbers is over 300 bucks, the bottom tank alone was over 200, it’s a bait tank from BassPro, I’ll replace it to match the top.
Valves and plumbing were here already, I also had pumps and heater, those clear bulkheads are 18 ea so just add on.
I had to get a Booster pump and I probably will get a couple more canisters to use as double DI resin for last stage and install two sediment cartridges or two charcoal ones.
I didn’t add the Flood Guardian because I’ve been waiting on a member for it, It’s a great add-on to prevent floods.
To me is important to have extra rodi water available to replenish as much as needed on my ATO reservoir, and also have Saltwater available in case there’s an emergency, a tank seam burst, setting up an emergency tank, doing water changes etc.
 

Attachments

  • IMG_7740.jpeg
    IMG_7740.jpeg
    338.1 KB · Views: 39
I was able to start cleaning more stuff to start a leak test on everything but got stuck due to missing fittings for the pump that I’ll try for the Reefer 250
I’ll also test the heaters and see if they can handle to keep up the temps.
Will gather more 3/4 or 1/2 pvc grey plumbing, or any fancier color, to install the two reactors and the UV sterilizer. I’ll also try this Algae Reactor, first time I’ll jump into algae reactors, had an Algae Screen, not a reactor, but that thing did wonders in a Biocube that I had in the past.
I’ll also plumb the ReefMat later.
I’ll replace the Reservoir that I had in mind for this setup and get the RedSea one, I really don’t like the material they used to build them but I really like the space saving of them.
 

Attachments

  • IMG_8226.jpeg
    IMG_8226.jpeg
    362.7 KB · Views: 27
  • IMG_8228.jpeg
    IMG_8228.jpeg
    593.2 KB · Views: 31
I would wait off on firing up the algae reactor for long time unless you are planning to start the tank fully packed. Specailly that type of reactor. I used algae scrubber on my system from early on and I think it did more bad than good to my system. I took them off after 2 yrs and also had to lower my water change from 20% weekly 10% weekly to keep my nutrients stable without stripping away too much. I guess it depends on your feeding as well.
 
I would wait off on firing up the algae reactor for long time unless you are planning to start the tank fully packed. Specailly that type of reactor. I used algae scrubber on my system from early on and I think it did more bad than good to my system. I took them off after 2 yrs and also had to lower my water change from 20% weekly 10% weekly to keep my nutrients stable without stripping away too much. I guess it depends on your feeding as well.
I completely agreed. I’ll probably don’t use it as an algae scrubber for now, instead I’d be using it to grow chaeto algae.
 
Same thing. Turf algae and chaeto algae does the same thing. Strips away nutrients. I had used Poseidon one (same idea as the one you have with lots of light), and added chaeto and it made all my corals lose its colors and I can tell it was struggling to fight for both nutrients and micro elements that corals need to grow). While chaeto grew so fast and thick.
Use it when you are fighting with high nutrient problem. And when you use the thing, you will notice it very fast. Which is good.
 
It seems reasonable, given the nutrients that corals need and the ones that are being consumed and exported. I’ll hold with it for now until I’ve start to notice extra Phos and NO3.

I’m adding the ReefCan 18, even though I dislike the material that the use to their design, I feel like the space saving is more important and that’s the reason I grabbed one. At this point I’m considering on installing it in the back of the tank, probably… and live that space for plumbing, reactors, and UV, I’ll probably will be looking to get a slide compartment for controls.
 

Attachments

  • image.jpg
    image.jpg
    344.5 KB · Views: 26
Its probably the best for you to go with bigger ATO container than that of 5G for your size of tank. 15-20Gal is probably good size. Evaporation rate will make you have to top off that ATO resovoir way more often than you will like. I usually go thru about 5Gal on small 25ish gallon nano sps while other one go thru about 3Gal a week on same tank. You can probably use those for dosing later on.
 
Thanks guys.
I was aware of the evaporation rate, I’d think about that, one thing that the bigger container takes a bit more space, but at the same time I’ve noticed, on my former tanks, that the water inside the reservoir some times tends to gets slimmy, but I probably have to blame that it might’ve had missing on rising the container between fillings.
I had plans to build a bigger tank in the past but got it sold… now that I’ve got this and Reefer170 I hope that I can settle with them, space or weight wasn’t an issue, I wasn’t building a monster tank before, just a 220g.
 
Here’s my other tank, it’s a Reefer 170G1 that I’ve got pretty much everything minus controllers… stand is somehow in decent shape but not pretty, I can live with it until I get to built one.
I’ve searched and found nice re designed RS170’s setups, where plumbing plays a nice part. Not sure I’d go that route but will see how it goes.
In the meantime I’m starting with an AI led fixture, a Jebao Crossflow powerhead, a DC return pump, Reefbreeders ATO, I probably get another RedSea Can 5g for this one get a 10g and swap it from the other tank, I might just look for another slim ATO reservoir, an IceCap Skimmer, 200w heater, I’ll probably keep the RedSea return cup and filled with Matrix, a Coralife 9w UV sterilizer and an AquaTop Media filter, still debating whether make it look nice by adding hard plumbing or just do regular hoses, I’d probably just run them with a Maxijet 1200.
This tank might start first as I’ve found a couple hiccups with the other one.
Will do a wet run test and try to detect leaks if any and if I can be able to keep temp.
I had this spot for location even though is near the window, I hope that’s not a factor for growth of algae if I get any sunlight.
 

Attachments

  • IMG_8602.jpeg
    IMG_8602.jpeg
    284.7 KB · Views: 16
  • IMG_8603.jpeg
    IMG_8603.jpeg
    354.3 KB · Views: 17
Made some time to make wire management and a quick made panel for controllers and power bricks. At some point I wanted to get the Red Sea panel for this tank but I don’t think that was goin to work and probably can collapse if I put more stuff than what it was designed for.
Right now this single piece can easily weight above or past 10 pounds, just with those bricks and wires. I still considering whether to have it installed inside a cabinet like insert on it or use a TV wall bracket and have it on it but I been debating mounting it in the stand which could stress the side of the stand panel or another mounting option.
I frankly want to pour water on tank at this point to check for anything need it but I’m still working on plumbing the carbon reactor and the UV sterilizer.
Realistically this tank could be considered simplistic since I’m not adding a controller or dosing pumps at the moment but I could consider that later. Already having control of temperature with the thermostat and readings of pH from yay monitor and probably the LED is controllable but I haven’t had time to go deep into the settings.
I’ll keep upgrading if there’s the need of anything more sophisticated or advanced, I don’t know at this moment but I might consider WiFi dosing and a WiFi controller like Neptune probably.
 

Attachments

  • IMG_8687.jpeg
    IMG_8687.jpeg
    359.2 KB · Views: 16
  • IMG_8633.jpeg
    IMG_8633.jpeg
    432 KB · Views: 11
  • IMG_8632.jpeg
    IMG_8632.jpeg
    397.1 KB · Views: 14
Looking good man. Good to have you back!
Thank you my friend.

I’ve been able to put a bit more time to finish this, hopefully it can run as is right now.
Got the Sterilizer and the Reactor hook up to the Maxijet 1200 pump, I’ve also got the small valves to control the output of them, I won’t probably run them until I’ve ran the tank for a few time.
Will test everything with RODI water that I just made from having the filters tested.
Won’t be using pipe tubing again for plumbing 😅😅😅 so darn stiff and I wasn’t able to cut perfect lengths with it 🥹
 

Attachments

  • IMG_8689.jpeg
    IMG_8689.jpeg
    351.4 KB · Views: 13
  • IMG_8691.jpeg
    IMG_8691.jpeg
    467.7 KB · Views: 13
  • IMG_8690.jpeg
    IMG_8690.jpeg
    342.1 KB · Views: 13
  • IMG_8694.jpeg
    IMG_8694.jpeg
    368.8 KB · Views: 14
Hit it with a hair dryer or heat gun first to warm it up, it should be a heck of a lot more malleable and easier to make nice cuts.
Yeah, I did submerged pieces in hot water, going to try that as they have been installed and find out if they don’t coil back up curling.
 
Ah yeah, hot water is probably the best way to go about that. Good information to have, thank you, because if it was still that much of a pain, I'll probably want to pass myself.
 
I think this connection is going to be a problem unless you have restrictions flow valve of some sort. So the water don’t go into one another and the flow goes only one way. PS. That’s a lots curves and of flow turning which will also restrict the flow. Flow should be controlled from the inlet.


Edit: I see the way the connection is~. I thought that was the outlet and not a inlet.

So ignore this comment. Smh.
IMG_1028.png
 
Last edited:
I see, for the angle that I could take the pic off it appears that both goes to the Reactor but the manifold sends to Sterilizer too. Tried to minimize the elbows and found a couple of Ehiem elbow connectors that are soft angled but just for the 1/2” pipe, if the decide to replace the 45* elbows for the other type I’ll have to find them in 5/16”


Got water on tank to test and found just a couple issues:
•Skimmer pump is not working properly, cleaned inside the volute for calcification and it sometimes works and then it will stop.
•Maxijet pump will be removed because it creates vibration, I’ll find a DC pump that I can swap with.
•Got a leak from the water pump to the tank but thanks goodness I have extra O rings and placed on the bulkhead as well as replacing the hose for a softer one.

I’m removing the sock and installing a RedSea Nanomatl
 

Attachments

  • IMG_8699.jpeg
    IMG_8699.jpeg
    282 KB · Views: 3
Back
Top